

Is Pixel Art Easier Than Drawing
Even if you weren't around to experience the wonders of classic video games from the 1970s through to the 1990s, it'south never as well late to develop an appreciation for the distinct art form that evolved to meet the needs of these games. Information technology'southward an fine art form we know today every bit pixel art, and information technology'due south one of the best ways to earn your stripes in 2D computer aided graphic pattern.
The reason for this is that pixel art places heavy demands upon the artist. It requires more discipline and is more rigid than most other art forms. Pixel fine art forces you to focus and isolate what is nigh important in an image and utilise only that, without providing the finer control you lot could use in a more detailed cartoon style. It'due south a "less is more" arroyo to drawing, and it makes you better at drawing.
Pixel art takes fourth dimension to master. Later on all, you are creating your images one pixel at a time, and every epitome requires conscientious planning. You'll demand to learn to piece of work with a limited palette, and without the benefit of natural curves. You'll also be working exclusively in a 2d environs, where if y'all need a 3D look, you'll demand to create information technology using tricks such equally isometric perspective and parallax scrolling.
Learning to animate sprites and backgrounds is besides an excellent mode to beef up your programming skills if you're handling an entire game projection by yourself. Now that mobile devices are more connected and still usually lacking the power for sustained 3D gaming, 2nd games are making a resurgence, and you can actually put these skills to work to earn some extra cash when pattern work isn't flowing freely to your door.
Pixel art doesn't require any special software. Yous tin create pixel fine art in any basic cartoon program. Many pixel artists started their craft in simple tools like MS Paint, but it'south better to use more sophisticated software that uses layers and custom grids, and then yous can really tweak your designs to perfection. Inkscape is really good for this purpose. Information technology's free, has congenital-in isometric grids, and works perfectly for pixel art.
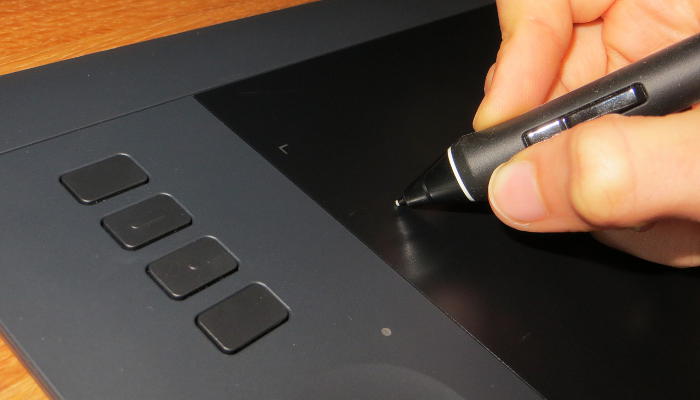
On the thing of hardware, you can use a mouse, but I find it easier to use a graphics tablet considering I tend to go "mouse easily" when doing detailed fine art work, and then I would recommend using at least a basic graphics tablet.
Why pixel art is ideal
Far too many people utilize the words illustrator and designer interchangeably. Really an illustrator is far below the level of a designer. Illustrators simply draw things according to the request of their client. Designers design things co-ordinate to the needs of their client. It'southward a massive deviation.
Learning to create pixel art ways learning how to innovate artistic solutions to come across very specific needs. It's much more than just drawing. The planning, the attention to item, the ability to piece of work within the limitations of technology, and devising strategy to overcome those limitations, is what makes a great pixel artist likewise a slap-up designer.
The world of pixel art
Contrary to what you may expect, the market for pixel art is big and information technology's growing. Expectations were mostly that pixel art would die out once technology reached the bespeak where information technology was more applied and viable to use vector art and 3D CGI. In reality there is however strong demand for pixel art and it has actually gained a wider scope of application. Where once pixel art was mainly confined to gaming, information technology is now used in a very broad range of applied applications.
Some of the areas where pixel art is selling include:
- Mobile games and retro-themed games
- Infographics
- Website design
- Interface blueprint
- Designs used on wearable, key tags, etc.
- Television graphics (eg: The Information technology Crowd, Practiced Game)
- Pixel art comics (eg: Diesel Sweeties, Kid Radd)
- Movies (eg: Wreck Information technology Ralph, Pixels)
- Pixel art exhibitions and private collections
There can be other potential markets that arise from time to time. In some means y'all tin can even think of Lego bricks as a kind of pixel fine art, and it's actually possible to create 3D pixel fine art with Lego. Only that's non going to happen unless y'all first become a master pixel artist, so let's observe out some more than about how you do that.
Getting started in pixel art blueprint
The best manner to get into this earth is to enter some pixel art competitions and learn every bit you become. Of course when talking about competitions, we mean ones that are gratis to enter and that don't commercially exploit your piece of work by requiring yous to sign over all your rights to the competition organizers.
Adept pixel art competitions set up challenges that require you to use your skills as an innovative designer to reach the goal. Sometimes this is simply setting the theme, but information technology could likewise include rules such as limiting the number of colors you tin employ or setting a maximum pixel count. These are all constraints that game designers once had to work nether. When you learn the same techniques, in the aforementioned conditions, yous are developing strong skills and hopefully a better understanding of the entire design process.
Training
There are plenty of gratuitous online tutorials and yous tin purchase books on pixel fine art or game pattern to get you going. For a more than in-depth introduction, you could consider taking a udemy course in pixel art. At only $35 and taught past an expert game artist (Marco Vale, currently Art Director at Indot Studios), it'south very skilful value.
The pixel art process
Creating any work of pixel art follows a linear process from concept to completion:
- The thought – you decide what you're going to create, or obtain instructions
- Planning – you lot make choices about how you're going to create the image
- Grid selection – you select the right grid blazon for the prototype you are creating
- Palette pick – you ready a color palette for the image
- Prototyping – an optional step to give you a basic frame work for the outline
- Outlining – you create the bones outline of the major parts of the paradigm
- Smoothing – you fix up any "jaggies" or irregularities to create a meliorate outline
- Coloring – you lot add colors to the prototype using the palette y'all fix up
- Shading – you add highlights and shadows to make your image more realistic
- Dithering – an optional step to replicate a true retro experience in a limited palette situation
- Selective outlining – y'all apply solid lines to selected portions of the image to give definition
- Anti-aliasing – a final smoothing pace in which you use color to enhance realism
- Setting – if the image you lot created is a minor part of a larger scene, you lot ready in into its setting
Some steps such as dithering and anti-aliasing may be automatically handled by your drawing software. It depends on what you're using and what options y'all select.
The thought
Some people regard this equally the most difficult footstep in creating a new piece of work, merely actually it probably isn't. Your goal is to decide what yous're going to create, or in some cases to take instruction from the client pertaining to what they want. Inspiration can come from the real world around you, or from movies, games, books, and anything else that tin assistance yous visualize the objects that will appear in your scene. For this instance, we'll create a flower pot that would exist a prop in a larger scene.
Planning
In this pace you already know what yous're going to create, so now y'all are thinking most how you're going to create it. The first major decision will exist whether you're going to design a flat image or to give it a 3D perspective. Yous'll as well make up one's mind how detailed or realistic the image should be, whether it needs retro look, and other things like that.
The more than realistic y'all want the image to be, the more pixels and colors you'll demand to utilize, and the longer information technology will take to create. If you're designing for a competition, some of these choices will already have been made for you, only you'll still need to devise the best way to achieve the event.
A sensible thing to exercise would be to print out the grid that yous'll be working with and use it to brand a paper sketch of the finished computer image. This will serve equally a reference for the bitmap y'all create, to help yous proceed the perspective and calibration consistent.
Grid selection
This is determined by the nature of the work you are creating. For flat images, you'll use a standard grid where all the lines intersect at right angles.

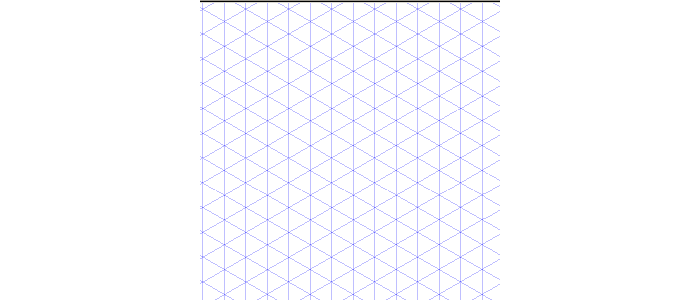
In a 3D scene, y'all have a selection between using an isometric grid (the most common choice) or an oblique filigree. An isometric grid has lines that intersect at 30 degrees:
An oblique grid has lines that intersect at 45 degrees:

Oblique drawings are practiced when you want to include a lot of fine particular, but in general isometric provides a amend view and feels more realistic. It'south the more widely chosen cartoon style for practiced reason.
Palette option
You could leave this step until you're set up to color, only actually can assist with the rest of the process if you ascertain your colors early on.
Prototyping
The flowerpot in the example is basically a distorted cone shape, and every bit with all second imitations of a cone, we create that bones shape by using stacked ellipses. This saves time and likewise demonstrates the value of using Inkscape, because it has algorithms to produce smoother lines on curved edges than many other drawing programs. We just need to make sure the ellipses align nicely with the grid.

Then use some straight lines to connect them (gently curved lines are even more realistic if you have the patience to draw them).

Outlining
In this step, we draw the outline of the image that nosotros want to pixelate. If yous made a image of the epitome, this function is like shooting fish in a barrel. Showtime create a new image layer and stack it on top of the other layer (in Inkscape, the new layer automatically has a transparent background). Lock the prototype layer, then select the new layer and use it to trace over your prototype with the pencil tool. Disable grid snapping when tracing curved lines.

If you have any difficulty seeing your new lines, merely reduce the opacity of the prototype layer until information technology is easier to see your outline layer lines. Don't trace all the lines, just the ones that would make sense.

You tin delete the prototype layer after completing outlining, if you wish, or only brand information technology invisible.

Smoothing
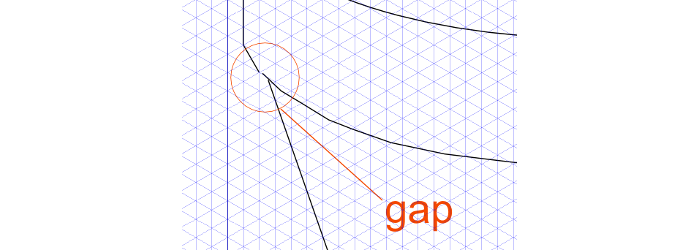
This is a hard stride. For this you zoom in on the curves in the image and effort to correct any jagged lines that make the image look less natural. Depending on the level of the image, y'all may not need to practice this (if your paradigm is 32×32 pixels or less, at that place is very little you lot could do to improve it by smoothing.
The manner to exercise your first smoothing run is to zoom in on the image and so you lot can meet where the curves aren't well divers, or where in that location are breaks (gaps) in the solid lines. Any gaps will cause color haemorrhage if you use a bucket fill up, then it's a good idea to eliminate gaps. Call back that you're just doing one pixel at a time, which is where a tablet makes the chore a lot easier than a mouse.
Coloring
This is what you used to do for fun when you were v, except now it's a lot easier. Y'all can fill big areas of color with a saucepan fill, and many cartoon programs permit you set a gradient that may or may not give you a realistic look. Otherwise it's the same deal equally smoothing: zoom in and ready your pixels one at a time. Don't brand a divide color layer, because your software may not recognize boundaries from a different layer when doing a bucket fill.

Shading
Solid colors are easy, but to become a realistic look, y'all demand to use shading. It's easier to exercise shading on larger images because they accept more pixels for you to work on. The first footstep in shading is to figure out how the light is hitting your object or scene, and so apply highlights and shadows in a realistic style. At offset this will be difficult, merely with experience and feedback from beau artists, y'all'll become the hang of it. Here I'm only going to shade the dorsum wall of the pot, just information technology would be ameliorate to apply some highlights on the front end wall.

Dithering
With a limited palette, you can't always get every shade and colour you'd want, and making subtle changes between face-to-face areas is difficult without dithering. It'due south not something that'south required on mod hardware, but information technology's often applied for situations where you want a retro 90s await or where for diverse reasons yous're required to piece of work with a limited palette. Some software tin can handle dithering for you lot automatically, or you may accept to create your own dithering. This image is too simple to demand any dithering, but here is a tutorial that explains how to create a faux dithering event in Inkscape.

Selective outlining
This means replacing black outlines on internal areas with a more natural looking color and only outlining those portions that need outlining for definition. In real life, the veins on a leaf are not black, so they shouldn't be in your drawing either.

Anti-aliasing
This is similar to smoothing, except y'all're looking more closely that regions of color that may need "bumping" in order to soften the lines a bit then they seem more realistic. Bumping a color simply means choosing a colour shade for a pixel between the colors of the pixels on either side of information technology. Intentional blurring makes lines less sharp. Every bit with dithering, your software may automatically utilize anti-aliasing for you.
Setting
Putting your finished object into a larger scene is chosen setting. Y'all don't need to practice this with character sprites or objects that are movable. You can do that later with lawmaking. Use setting for fixed objects that don't move. Blithe objects should be converted to sprites, which is a topic for another 24-hour interval.
What to do if your image is not pixelated enough
One of the problems is that Inkscape and similar vector programs just practise also skillful of a job of saucepan fills, so colors look actually polish and vectory. If you lot desire a pixelated wait, then you lot need to consign the image to png, open it in GIMP, and utilize the Pixelize filter, which you'll find in the Mistiness section. This will give you a result similar this (which you may then need to anti-alias):

Final remarks
Pixel fine art is far from dead, and good pixel artists still get a lot of respect in the blueprint community from those who understand the dedication it takes to become a principal. Learning to construct images pixel past pixel makes you a amend designer, and peradventure a ameliorate engineer as well. In that location is withal a strong market demand for pixel art and relatively few talented pixel artists on the ground who are serving that need. Yous can make money in pixel fine art, or just use it as a way to beefiness up your skills. Either fashion, it's fun and rewarding, well worth doing.

Source: https://ecommerce-platforms.com/articles/why-pixel-art-can-be-a-perfect-training-ground-for-graphic-design
Posted by: meachamdiesse.blogspot.com
0 Response to "Is Pixel Art Easier Than Drawing"
Post a Comment